The typical HeCd laser can produce a high quality beam at 442 nm (violet-blue) and/or 325 nm (UV) depending on the optics. Typical power output is in the 10s to 100s of milliwatts range. In terms of popularity, the HeCd laser probably ranks behind HeNe, Ar/Kr ion, and CO2 gas lasers. Although its wavelengths may be highly desirable for some forms of spectroscopy, non-destructive testing, and stereo lithography, they are pretty useless for laser shows and other common hobbyist applications. For that reason, as well as the higher complexity (and cost), one doesn't see these lasers nearly as often as the more common types.
I'm aware of only one major manufacturer of HeCd lasers in the USA: Kimmon. Melles Griot acquired the HeCd laser companies Omnichrome and Liconix, but has now dropped all HeCds from their product line. Some people consider Kimmon to be the "gold standard" of HeCd lasers anhow, and they do have a wide selection of models, some with higher maximum power.
While most HeCd lasers operate at 325 nm and/or 442 nm, one manufacturer, The Cooke Corporation used to have a "white light" HeCd laser putting out 5 lines in the red, green, and blue, out of a possible 12 lines with their design. Except for its limited power (50 mW total max), such a laser would be good for laser shows and laser TV. (As of 2006, perhaps earlier, this laser appears to be discontinued but used units may be available. An unusual laser like this will probably be a collectable someday.)
In fact, it's sometimes possible to get a few of these visible lines, at least momentarily during warmup, from a normal UV (325 nm) HeCd laser and this might seem quite surprising:
(From: Steve Roberts.)
"You just passed through the correct pressure for multiline operation for a very brief period of time, and swept through the HeCd lasing spectrum. Ours used to do that during warmup for about a half second. I bet the OC is coated to reflect visible nearly 100% to keep visible collateral (non-lasing) emissions to a minimum and it lased for just a little bit on that. The pressure for UV and blue gain are quite far apart, but not that far."
HeCd laser tubes ARE more complex than those used for HeNe, Ar/Kr ion, and CO2 lasers. In addition to often using a heated filament/cathode, they also include a reservoir for the cadmium metal and a heater to control its vapor pressure, a mechanism to add helium as needed to maintain correct pressure, possibly an overall heater and thermal insulation to control tube temperature, and various sensors inside the envelope to monitor these parameters for use by several feedback loops in the power supply. The power supplies are also correspondingly more complex with multiple feedback loops and power sequencing logic.
As with other gas lasers, both internal and external mirror HeCd lasers are available. External mirrors provide a polarized beam (due to the Brewster windows) and allow for swapping of optics to to select 325 nm and/or 442 nm operation. But for applications where this isn't important, internal mirrors eliminate the need for optics cleaning. Even if the mirrors are internal, they are often (screw) adjustable to some extent. Melles Griot purchased the HeCd operations of both Omnichrome (internal mirror) and Liconix (external mirror), and continue to manufacture HeCd lasers designed by both companies. A few Omnichrome HeCd lasers are linearly polarized, I assume through the use of a Brewster plate inside the tube.
The output power of HeCd lasers is generally fixed by operating conditions, but by adjusting Cd pressure, may be traded off against optical noise. There is usually no light feedback to regulate output power, though some Liconix (and possibly other) HeCd lasers implement active noise reduction, which probably uses optical feedback to control tube current. But since both He and Cd are replenished as needed, the output power of a HeCd laser should be fairly constant over its life. However, not adhering to the correct power sequencing particularly during shutdown (accidental plug-pull or power failure) can result in cadmium vapor condensing on the Brewster windows or internal mirrors. Each event will result in a slight loss of performance which can eventually add up to a very sick laser for which there may be no cure. Omnichrome specifically warns about this while Liconix claims it doesn't matter. While these HeCd lasers do use very different designs, I would still be rather suspect of the claims.
Finding a working HeCd laser surplus at a reasonable price seems to be virtually impossible. Most HeCd laser heads on eBay are in a very poor state of health or totally dead. There's no way to easily inspect or test a HeCd laser head or tube by itself for anything beyond ionization. A HeCd laser tube depleted of cadmium (which is what happens once it's operating hours have been used up) is basically a high tech wall sculpture filled with a hazardous material (cadmium). And by that time, they actually look quite ugly with cadmium debris coating the interior of the tube in random places. High mileage HeNe laser tube bores filled with brown crud look pristine by comparison. However, an ugly tube may still work perfectly.
So, the only way to know for sure is to run the laser on the proper power supply. Unless your electronics skills are quite sophisticated, it only makes sense to use the correct mating power supply. So, finding a HeCd laser head without power supply may not be such a great find. Substituting a power supply from another manufacturer would also be challenging because they may use different tube currents and incompatible schemes for He and Cd pressure regulation. Building a power supply from scratch is much more complex than for most other gas lasers. And, close isn't good enough because there is a rather narrow range of conditions for tube current, He pressure, and Cd pressure, where there will be any lasing at all. Using trial and to find the correct operating conditions may damage the tube beyond repair. I don't know of any practical way to determine operating parameters experimentally without fancy optical and electronic test instruments. Those sorts of details are not forthcoming from HeCd laser companies.
Photos showing a few typical HeCd laser heads, tubes, and power supplies are
available in the .
Check under both "Liconix Helium-Cadmium Lasers" and "Assorted Helium-Cadmium
Lasers". The complexity of both the tubes and power supplies is quite evident.
There's not really any such thing as a really small HeCd laser (at least
physically). The shortest tube I know of is about 15 inches long. But there
have been some very large ones:
No joke here, I had the absolute last SP-185 HeCd ever made - it was
the length of an SP-125 HeNe laser, more than 6 feet). I also had one spare
plasma tube. After about a 20 minute warmup, that HeCd laser put out
200 mW of 442 nm. I would shoot it down the street about a mile or so,
and when you would walk under it, you would loose all perspective on
where the beam (from the side view) was in space. Use a beam expander
and a spatial filter and it would produce a speckle pattern that would
literly make you wet yourself. When you would align the bore with the
cover off, it put out so much UV it would sunburn the underside of your
arm. Sold it to a holographer back in 1980 or so. I wonder if it still
runs. That is the one laser I regret getting rid of.
The helium reservoir (with heater) and thermistor pressure/temperature
sensors in Omni HeCd lasers are located near the cathode-end of the tube.
There are two sets of sensors, each set sharing a common electrode, should
one set go bad. If one should go bad (not sure how this might happen!), it's
may be best to switch the wiring entirely to the other set, though any
two thermistors would probably work just about as well since they are all
identical. The partial pressure of helium is order of 1,000 times that
of cadmium during operation, so these pressure sensors are not affected
significantly by the cadmium pressure.
The Cd reservoir in Omni HeCd lasers surrounds the bore near the anode-end
of the bore (but not at or beyond it). A gap in the bore proveds access
for the Cd vapor.
Some longer Omni HeCd tubes have the remelt heater and a user activated
remelt function. Shorter ones do not but perhaps a heat gun could
be used with care to do this if needed. But the melting point of Cd is
about 321 °C. So, maybe not. :( :) However, Cd may sublimate before
it melts at low pressure, but I have no information on that.
Omni HeCd laser tubes have dual heated filaments (if one should burn out).
Omni HeCd laser tubes have the HR mirror mount flange as the anode and
there may be no WARNING stickers with respect to the high voltage dangers.
Removing the cooling fan at the HR-end of cylindrical HeCd lasers exposes
this with no protection.
Omni HeCd lasers use internal mirrors. Cylindrical Omni HeCd laser heads
use tubes with flanges that permit some mirror adjustment but they
are not attached to any part of the case or a resonator structure.
Rectangular Omni HeCd laser heads use tubes of similar design, but
the flanges are attached to a three-bar Invar resonator,
with large nuts for adjustment accessible from outside the case.
WARNING: Since the temperature of the tube affects helium and cadmium pressure,
both critical for proper operation, major parts of the tube may be covered with
thermal insulation. At a minimum, this will surround the He and Cd heaters.
In older lasers, THE MATERIAL WAS ASBESTOS! Thus, HAZMAT handling
procedures apply any time maintenance or modifications are being done inside
the laser head!
CAUTION: If covers or shrouds are removed to gain access for testing,
or just to admire the pretty glow, behavior may be different due to the change
in the thermal environment. Inadequate cooling may also be bad for the tube.
(From: Pat B. (laserman@bendcable.com).)
The HeCd Laser Tube
Although the HeCd is still a gas laser, its construction is quite complex
compared to, say, a common HeNe laser tube. Specific reference may be
made to Omnichrome (Omni, now Melles Griot) HeCd lasers:
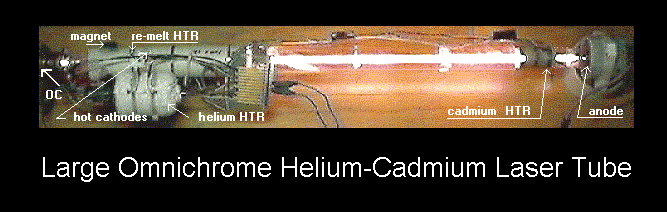
A Typical Larger HeCd Laser Tube
Here, courtesy of Daniel Ames (dlames3@msn.com) is a photo and specifications
for an Omnichrome 074 HeCd laser tube. See: Large
Omnichrome Helium-Cadmium Laser Tube.
This is one big Helium Cadmium Laser tube, measuring 32.5" in length. It is made for the typical 3 rod resonator frame. Note the typical bright gold/yellow color of the discharge with no pink from air leakage visible.
This tube goes in the model 374 laser head which is a larger version of the 456 head. The head's model number indicates the lasing wavelength: A 374 is 325 nm (near-UV) and a 474 or 456 is the 442 nm (violet). Omnichrome is now a part of Melles Griot. Lasers essentially similar to the original Omnichrome line are still being manufactured, though a new and improved power supply (the LC500) has replaced the Omni-100 we all know and love. :)
Here are some of the specifications for the tube:
General Omnichrome HeCd tube data:
For each model series (e.g., X39), the number is the distance between the mirrors in cm. All are normal single bore tubes except for the X112 which is basically two X56 tubes joined end-to-end and powered separately.
The actual operating voltage set-point may be varied over a 6 to 7 percent range via the R2 pot on the laser head PCB. The controlled variable is actually Cd temperature but the reference is tube voltage, which is a strong function of Cd pressure. This may be used to optimize power or noise performance.
The cadmium doesn't get used up, combine with anything else, or leave the tube, but as the laser is operated, the cadmium vapor is whisked down the tube from anode to cathode in a process called cataphoresis and is deposited (hopefully) in a special area for this purpose called the cadmium condenser. However, some will also end up on the walls of the tube and elsewhere - away from the heater. Once all of it's gone from the reservoir, there is no easy way to get it back (though I can think of some not-so-easy ways that might work). The rate of cadmium depletion is on the order of 1 mg/hour. A typical cadmium reservoir is originally loaded with a few grams of cadmium. So, that is ultimately what limits the life of any HeCd laser.
The helium doesn't get used up either, but some of it ends up being buried under the deposited cadmium and on/in the electrodes. This reduces the pressure in the tube as it is run so there is usually some means of replenishing helium from a helium reservoir. Omnichrome (now Melles Griot) HeCd lasers have a sophisticated He pressure sensing system for this purpose. Liconix HeCd may maintain Cd temperature constant and then use tube voltage for sensing helium pressure.
Unlike a HeNe laser tube where power tends to peak and then decline with use since it's sealed with a fixed quantity of helium and neon gas, a HeCd laser in principle can operate near full power and then die within a few minutes when the last bit of cadmium is vaporized. Until then, both He and Cd are replenished as needed. (It's not likely that lack of He will be a problem since there is orders of magnitude excess.) However, as a practical matter, there will be other mechanisms reducing output power over their life. Nothing is perfectly pure and contaminants are outgassed as the laser runs. Cd on the bore walls reduces mode volume. Ion damage to internal mirror tubes and Cd on Brewster windows or mirrors all contribute. So, as with other lasers, there's usually a "warranty" power which will be lower than the typical output power when new. And although some HeCd lasers may run for 10,000 hours or more, the typical life expectancy is in the 4,000 to 6,000 hour range.
Given the added complexity and very specific operating conditions, the cause of problems with an otherwise undamaged HeCd laser even if it lights up is much more likely to be electronic in nature than with, say, a common HeNe laser. If any of the control loops isn't functioning properly, there probably will not be any beam.
Tube will not start:
Test with HV probe in power supply before starter, or at power supply or laser head test points.
Test with HV probe or by arcing to 1M ohm high voltage resistor to ground.
WARNING: 27 kV or more may be present if tube does not start.
CAUTION: DO NOT allow the power supply to continue trying to start for more than a few seconds. Apparently, the Omni-100 design is such that it may die after not too long.
CAUTION: DO NOT bypass the interlock with the HV cable unplugged from the power supply unless it can hold off 27 kV. The round AMP connector on the Omni-100 and Omni laser HeCd heads definitely cannot without the mating connector plugged in and fully seated. If the starting voltage is present, it will probably then arc between the pins which will damage the connector and possibly components inside the power supply, though it should shut down before electrical failure occurs. The plastic barriers in the cable-end AMP connector must be present to provide enough insulation, and even this appears to be marginal. Why didn't they use something more like a 4 pin Alden connector? :)
Disconnect tube from power supply and test for ionization with Tesla/Oudin coil, low power RF source, or HeNe laser power supply.
Test for filament voltage. Test filament for continuity.
Inspect the contacts inside both the cable and power supply and laser head connectors. This is a likely place for arcing, especially if the HV connector wasn't fully inserted and tightened at one or both ends. (Or you tried to bypass the HV interlock to test for HV without the cable or laser head being plugged as noted above!) This connector type is very marginal for the up to 27 kV that may be present during starting. A slight amount of damage may be cleaned up with alcohol and degreaser and such a repair might last awhile. Replacement of the damaged connector(s) is best.
There may be leakage, arcing, or a short inside the cable as well. Check with an ohmmeter and/or HiPot tester. If a problem is found, while a cut and splice job might be possible if the bad section can be located, replacement of the entire cable is the best solution.
Tube starts but there is no output:
See the section on testing for UV.
Measure tube current directly, or at power supply or laser head test points.
Not sure yet how to test this directly beyond making sure for the Omni-type that the sensor thermistors have the correct resistance at room temperature (5K to 6K ohms) and that the comparator and drive circuitry are working correctly.
Where the discharge color and tube voltage are normal, inspect the mirrors for contamination. Some evidence of contamination may be detected by shining a red HeNe laser beam through the mirror and looking for excessive scatter on the inner surface. There should be virtually no scatter.
Remove the cover over the end with the output mirror. Allow the laser to warm up and then gently press on the flange or mount at several locations around its perimeter. If there is a very slight misalignment, this may result in some lasing, and a starting point for adjusting the alignment. DON'T touch the mirror alignment adjustment screws UNLESS it is already lasing! In that case, NEVER lose lasing entirely!
WARNING: On Omnichrome/Melles Griot HeCd lasers, the HR-end mirror mount flange has the full high voltage on it. This is potentially very lethal. Testing at the output-end - which is perfectly safe - should be sufficient to determine if mirror alignment is the problem.
Output appears during warmup but goes away:
Check the color of the discharge. If it is blue indicating "gulping", check the tube voltage. If it is normal, He pressure may be incorrect. If it is low, there is a fault with the voltage regulation circuitry (Omni-type) or Cd temperature regulation circuitry (Liconix-type).
Check the He pressure sensors (if any), He heater, and He regulation circuitry.
Output power is low:
Beam power is unstable or noisy:
Laser shuts down:
(From: R. J. Zimmerman (safed_chuha@yahoo.com).)
Omnichrome HeCd lasers have a heated filament/cathode. Near the output-end of the laser are three leads on metal feed-throughs in the glass. These lead to two filaments. You can measure if they are open circuit with a multimeter.
If they are both open circuit (with the center pole between them) then the cathode is dead. Still, the laser would probably start if it weren't up to air. This would kill it very quickly from a condition that Omnichrome called "cold cathode." The plasma would search for electrons anywhere it could and eventually find them on the nickel ion shield on the inside of the laser just before the output mirror. In the process of stripping out electrons, nickel gets sputtered all over the inside of the glass near the output and it looks much like an old burnt out vacuum tube with a mirrored finish. The mirror gets coated too and this condition which is very rare, destroys the tube as there is no reasonable way to replace the optic.
Of course opening the glass would also require you to reprocess the laser and backfill it with a near vacuum of Helium, so it will be hard to find someone to do this indeed.
However, it really is very easy. Almost any common white paper stock will fluoresce blue quite nicely. Orange "Handle with Care" or "Danger" stickers fluoresce bright yellow. In fact, it's interesting and fun to see what type of fluorescence the HeCd 325 nm beam will produce with many common materials.
(From: Don Klipstein (Don@Misty.com).)
I have found that white cotton underwear and white cotton socks fluoresce blue from wavelengths as low as the 253.7 nm mercury line and as high as a scandium line that I believe is 391 nm. Works on everything in between such as the 313 nm and 365 to 366 nm line clusters of high pressure mercury. That's my best bet for 325 nm.
I doubt that most fluorescent lamp phosphors would work. But the phosphor from a high pressure mercury lamp is supposed to work from 313 nm and I give it a good chance at 325 nm. Most mercury lamp phosphors don't work at 365 nm but one does at least somewhat - from the oddball and probably obsolete Westinghouse "Standard White".
(From: Steve Roberts.)
Hey, we have a UV HeCd laser here at the University. I just tweaked the system it's in. However, I learned the hard way about UV HeCds - the UV they pump out is kind of hard to detect and at 13 mW was swamped on my fluorescent paper by the bore light. I had to eat some humble pie when after proclaiming that it wasn't lasing. But, if you move the paper way out from the laser, the beam is there and the bore light isn't. The beam diameter was very large (1.1 mm) compared to your average HeNe or air-cooled argon. Trying a bunch of different fluorescent materials resulted in disappointment as very few seemed to be pumped well by the 325 nm wavelength. Over the years I've been contacted by many people who said they had surplus Hecds that didn't lase, even with low hours, no matter what they did. I have a funny feeling quite a few of those were actually UV machines. It does show up on the power meter however.
I once had a long positive column self heated HeCd laser where the gain curve was centered around one temperature and fell off to near zero 5 degrees C either way from that point. That point varied from tube to tube, but was not mentioned in the manual, only the fact that if you didn't have the temperature spot on, you had no gain. Modern units are designed for a slightly wider operating range and usually have a glass frit and a molecular sieve to adjust the helium pressure as well. So don't dispare if you don't see any lasing for a while, HeCd lasers are difficult and the PSU may have to be matched to a given laser. You're not just looking for the Cd melting point, you're looking for the place where it has a high vapor pressure, which may be considerably hotter. Ask the manufacturer, they sometimes will tell what you need on a obsolete model, especially if you're a student.
But the only practical way to reduce helium pressure without opening and repumping the tube is by letting it run for a long long time. This could be months or years. There may be some scavenging of He if run without heating the cadmium, but it's probably at a much slower rate. So there will be a tradeoff in running with Cd being heated and high Cd pressure which should accelerate the rate of reduction of He pressure, but will use up more Cd in the process. I do not know whether there is an optimal Cd temperature that results in being left with the most Cd when all is said and done, but doesn't take totally forever.
Melles Griot claims that Omni-type tubes do not need to be run periodically to keep them healthy. But people who have used HeCd lasers tend to disagree. Maybe the technology has improved and there is no significant rate of diffusion of He from the high pressure He reservoir. Since modern tubes are hard-sealed, this is the only likely issue with non-use. Of course, if the power supply control loop for the He pressure was defective and let loose a pile of He, there may be no hope at all before the Cd is depleted.
There is no easy way to convince the Cd to go back to its reservoir It has been suggested that this might be accomplished by keeping the Cd reservoir cold and using a heat gun to evaporate the Cd in other parts of the tube so it will go there. However, when these approaches are evaluated more carefully, they don't sound very plausible, except possibly as an experiment. Normally, I'd be all for that, but if the tube should shatter during the attempt, there will be toxic cadmium all over the place.
There are a few problems. The melting point of Cd is about 321 °C (610 °F) and the boiling point is about 767 °C (1407 °F) at 1 atm. The vapor pressure is only 1 Torr at 400 °C and 16 Torr at 500 °C. But, under low pressure, Cd may sublimate - go directly from solid to gas - even before it melts. I have no information on that except for a NASA note that prohibits the use of Cd in a hard vacuum since sublimation may occur above temperatures as low as 75 °C. So, sublimation provides a possible mechanism to move the Cd, but it could be a very slow process. If sublimation doesn't help, trying to heat large parts of the tube to a temperature hotter than the clean cycle on a domestic self cleaning oven - approaching cherry red - and keeping the Cd reservoir cool at the same time without cracking the tube or destroying the optics would be quite challenging. All external thermal insulation, He and Cd heaters, wiring, and sensors would have to be removed. Whether internal mirror frit seals or Brewster windows would survive is another issue. And to further complicate things, the path to the Cd reservoir is through the narrow bore. In keeping the reservoir cold, there will be other parts of the tube with easier access that will also be as cold or colder. Getting a few mg of Cd back there might be possible, but a useful quantity would be another story. Another problem with any cadmium redistribution scheme is that any helium that was buried under the condensed cadmium during normal operation - and this is probably a good portion of what was replaced from the He supply - would be released, resulting in excessive He pressure and no way to reduce it without running a loooong time and using up the Cd. :) So, this approach really doesn't sound plausible. Comments to the contrary or otherwise are welcome.
I really don't know why they don't provide more cadmium. It's not expensive. Sure, other parts of the system might fail, but running out of Cd is guaranteed to result in a dead laser. But, redundant filaments and He temperature/pressure sensors are provided in Omni HeCd tubes. I guess they would sell fewer lasers if they lasted longer. :)
At least two types of schemes are used to control He and Cd in HeCd lasers.
The Liconix approach is slightly simpler but may be more sensitive to ambient conditions. I do not know what approach other companies like Kimmon may use.
The following control loops are provided in Omnichrome HeCd lasers. These are electrically independent, though there will be some interaction based on changes in He and Cd pressure.
The time constant for the He control loop is about an *hour*. And the effect of requesting more helium takes several hours to occur. So, even though the He heater may come on for a few minutes when the laser starts up, this has essentially no effect on He pressure. It probably occurs simply because the pressure is lower than normal until the tube reaches operating temperature.
Since the normal helium pressure is a few Torr, compared to a few milliTorr for the cadmium pressure, the He pressure is what primarily determines the overall gas pressure inside the tube. In addition, the area where the He pressure sensors are located doesn't see much of the Cd vapor as it's condensed before reaching there.
The time constant for the Cd control loop is about 30 seconds with Cd pressure stabilization requiring a few minutes. At startup, the Cd heater will be on at its maximum power (about 80 percent duty cycle for the Omni-100 power supply). This will descrease to 35 or 40 percent after warmup (lower if the ambient temperature is higher and vice-versa).
Note: The Cd Heater LED on the front panel of the Omni-100 only pulses at 60 Hz (every other triac cycle) so it's hard to estimate duty cycle by looking at it with unaided Mark-1 eyeballs!
Timing and control logic assures correct startup and shutdown sequencing, which is critical for long life. Fault detection circuitry monitors tube temperature to shutdown the system or prevent a restart if it becomes excessive (due to a fan failure or blocked air-flow). It is critical to the life of Omni HeCd lasers to adhere to the rules for shutdown. A primary reason for this is to assure that the Cd doesn't condense where it shouldn't be, particularly on the mirrors or Brewster windows. If power were simply shut off while the Cd heater was on, there would be Cd vapor in the tube, with some more coming from the Cd reservoir before it cooled off. But, without the discharge to provide some direction to the Cd, it would simply flow to all parts of the tube and some would condense on the optics. It wouldn't take too many of these "events" to kill the laser entirely. For Omni HeCd lasers, The discharge MUST be maintained until the cadmium reservoir has had time to cool down.
Some/most/all Liconix and Kimmon HeCd lasers have no power down sequencing and can simply be shut off due to the tube structure and thermal design with heatsinks surrounding the tube at strategic locations to condense Cd before it can get to the Brewster windows or mirrors. However, optics contamination requiring tube replacement has been a common problem with HeCd lasers in general so perhaps this doesn't always work reliably.
(From: Daniel Ames (dlames3@msn.com).)
Ya, these are some really weird and overly complicated animals. I have spent probably a hundred hours or more trying to diagnose my non-working HeCd PSUs which are still not working.
Power output is lower than expected:
Are you sure it is dying? How does the cadmium supply in the reservoir look? You should be able to see the (silver to aluminum in color) Cd metal from either end of the reservoir without having to remove its heater and covering. What color is the side discharge of the tube (gold, white, or blue)?
Is the power supply the right one for this tube? These MDL100-A's can be set up to run the larger Omnichrome series 74 heads also by changing the two large resistors near the fan in the PSU and readjusting the settings.
The He and or Cd heater control circuit may be out of adjustment. Also the reference voltage and current adjust trim pots could possibly not be optimized for your tube and power supply. From what I understand, they need to be tuned to each other to work their best, not just any MDL100 on any 56 head. It could still work, but could cause either a shortened tube life or low power output.
I would NOT recommend trying to adjust any of the electronics as they ALL interact with each other to allow the tube to operate correctly. 0r incorrectly!
NOTE: If you are going to try adjusting anything, trimpots or optical alignment, don't try to adjust anything without first making two reference marks, one for the stationary position and one on the item being adjusted, i.e., optical alignment nuts and/or the trimpot adjust slots. Plus, you would need to know what the ball-park settings should be. I do not remember what they should be set at, sorry.
Could the optic's alignment need a little fine tunning? Yikes, for UV you will definitely need a power meter!
Maybe you can just apply some physical pressure in different directions (after the tube is warmed up and stabilized) to the resonator rods separately, or on the mirror plates and watch the power meter. (WARNING: Take care with respect to the high voltage at the HR end!) If the output power increases, then the optical alignment needs some fine tuning.
And, for the low output power: Did you measure this output power with a properly calibrated power meter that is designed for this wavelength? If you used some other power meter, or a generic meter, most likely its response will not be accurate at the violet-blue or especially the UV wavelength. Most likely it will read lower than the actual output. If you know what type of photodiode it uses, then if you can find the optical response specs for it, you will be able to figure out the response % or ratio for the 442 or 325 nm wavelengths (or the combination if running multiline).
Fan doesn't run:
Is this the fan in the laser head or the power supply?
The filaments come on: They may be burnt out or just not operating due to bad connections or a bad component in the power supply. The filament regulator is fairly simple and it's easy enough to check the filaments and wiring for continuity.
Filament lights up but the discharge will not come on:
There is probably no high voltage, and/or start voltage. see below.
The high voltage cable arcs inside:
I hate it when this happens. :(
WARNING: From experience, DO NOT TRY TO USE THIS HV CABLE, or you could damage the electronics in both the power supply and the head!
Unable to locate a replacement for the SG3527J driver chip:
Right... Silicon General was bought out by Unitrode (Now Texas Instruments) but they discontinued this chip or it was extinct before they took over SG's line and did not bring this chip back. Are you sure it is not an SG3627J (not that this helps much)? All my MDL100As use this chip for the HV control chip. The SG3627J and its interchangeable cousins, SG1627 and SG2627, became extinct back in 1991 and Omnichrome no longer has them in stock, but they do make an after market circuit board that will substitute for it. Last time I checked (approximately a year ago), it cost about $70.00. Yikes!!!! I hear that there is a way around this, but I am not sure of how it is done. I can't find a datasheet for the SG1627, but the SG1549 Datasheet does have a functional block diagram (on the last page).
The high voltage transistors (MJ10007) cross reference to a NTE97. The SG1524/SG2524/SG3524 cross reference's to a NTE1720. Note: These 3 SG chips are the same chip but with different operating temperature ranges, either will work just fine with these PSUs.
(From: Sam.)
I believe the SG3627 is a multiple channel MOSFET driver so this would imply that some sort of transistor network can be installed in its place (for each channel). This shouldn't be that difficult to implement or find a substitute part (though not pin compatible).
The SG1524/SG2524/SG3524 is still available for less than $1 from Mouser and other suppliers. I expect that and original MJ10007 replacement can be found as well. (ECG/NTE/SK parts can be used in a pinch but may be of variable quality and are almost always much more expensive than the real thing).
(From: Daniel.)
I have now found a distributor that most likely still has some SG1627 Chips for Omnichrome HeCd (and other) switchmode PSUs. I had contacted SGS Thomson through their web site, who referred me to a distributor, so I contacted them back in March, 1999, and they had 97+ of these chips. Omnichrome used many of the SG1627, SG2627, and SG3627 for the same chip. However this distributor does have a minimum order, (*&%$##*) which at that time was $100.00. The more you (or we together spend) the more chips for the dollar we get. Contact: Ron Holmes (ronh@accgrp.com).
High voltage is not present:
Many different things can cause the high voltage DC to not work or shut down:
The Omni-100/A power supply is for the X39, X56/X056, and X112 lasers while the Omni-100B power supply is for the X074 laser. The value of the internal ballast resistors in the Omni-100 and Omni-100B power supplies is supposed to be different, but I don't know if anything else, like the HV inverter circuitry, also differs. I don't know if there is any functional difference between the Omni-100 and Omni-100A or if the latter is simply a later (and current) model. There was also a 100C which has an additional 3 pin connector on the rear panel, mounted differently than the others with 4 screws, so possibly a custom unit. There are also some internal changes:
(From: Matt Coisman.)
The differences between the A and B models are unknown but all I know is that the ballast is different, but it is possible there are other changes, likely to the HV module as the schematic states 2.6 or 3.6KV depending on model.The Omnichrome 100 I have (dated 1988) is a bit more basic but largely the same as the model A (dated mid 90s), which has a few more components inside it on the PCB mounted above the main one (WB4), but this is the only difference I see. It is labeled as WB4 on the original Omni-100, and in the revised "A" version (with some minor rewiring into the supply) it is labeled WB4-B.
The C model is a bit different. It has the standard parts of the model A, including the same 2x 10K 50W ceramic HV resistors, however it has several differences. It has an additional connector (more on this below), and also has 2 additional PCBs. there is a small board (WB7) added on top of WB1 (main board) mounted between it and the WB4 board which is on metal standoffs. It further has another, much more complex and populated WB4 board, labeled as WB4-D, which has an additional yellow/green LED accompanying the red overcurrent LED. then on standoffs above the WB4-D board, there is another board containing several solid state relays (two DC and one AC) each with an accompanying red LED. The additional 4-pin (3-pin populated) connector is mounted in the [normally covered] hole next to the 9-pin AC input on the A and B models. This connector bears the 3 AC pins (pins 7,8, and 9) removed from the 9 pin connector and isolated in this other connector, allowing easier, separate access to the 6 pins above it, which are used for remote control purposes. The normal cables supplied by the factory bridge pins 1 and 5 bypassing this function by setting the remote function to "operate" by default, leaving the 3-position knob on the front panel of the supply the sole determining factor for driving the supply. To use the C model, presumably you must connect the AC to the separate connector and a remote to the 9-pin (now 6-pin populated) connector. You will have to turn the knob on the front panel to "operate" and this will pass control to the remote box. the circuit in the remote must short pins 1 and 5 for "operate". by simultaneously disconnecting pins 1 and 5, and shorting pins 2 and 6 will put the laser into "standby". Pins 3 and 4 are for adding an emission LED with an appropriate resistance in series to limit current to it.
I recently saw an auction for one being sold with an old retired model x56 head in an obscure place. I'm quite sure they were probably a matched pair. It would presumably be a component for in another device, which is likely why you don't see many "C" models floating around.
Since there are basically 3 different WB4 iterations (blank, B, and D) I imagine there is a C version as well....perhaps in the B model? :)
An Omni-156, which was used with some versions of the X56 laser head, also exists. I don't know whether it came before or after the Omni-100, or if other model-specific variations were built. But the Omni-156 appears functionally identical to the Omni-100s except for the lack of Standby mode. The construction is similar with most of the same components in the same locations, but the LEDs on the front panel are arranged horizontally instead of vertically. :) A toggle switch substitutes for the 3 position rotary switch found on the Omni-100s. There is also one other known difference: The HV power and interlock connections on the 4 pin high voltage laser head cable are swapped compared to the Omni-100s. So, attempting to run a normal X56 laser head with this supply, or vice-versa, should result in absolutely nothing happening! I don't believe one or both will explode though. I discovered then when I went through the checklist of resistance tests on one of the funky 456 laser heads. This supposedly assures that the power supply won't be damaged by a defective laser head. Everything passed except the high voltage cable and there was no evidence that it had been modified. I later acquired an Omni-156 power supply, which had the swapped wiring.
CAUTION: The Omni-100/A/B power supplies are NOT interchangeable with X39, X56/X056, and X074 laser heads! Attempting to run an X074 head on an Omni-100 will likely blow the power supply upon power-on. Although the connectors are the same with the same pinouts, inverter components will blow as the high voltage ramps up but the tube doesn't light. I would imagine the opposite situation to be no better, though I don't know what happens.
Melles Griot no longer seems to manufacture the cylindrical Omnichrome HeCd laser heads. The rectangular ones all have 4 digits in their model numbers - X056, X074, and X112. The really short X39 seems to have disappeared entirely.
I have been testing non-lasing Omni model 439-5 laser head with an Omni-100 power supply. More about this specific laser below. I also have a healthy Omni model 3074 UV HeCd laser. The info below is partially from my observations and partially from the Omni operation manual.
CAUTION: Before applying power, make sure all three circular connectors are fully seated and tight. Failure to do this with the high voltage connector - which is already marginal for the voltage it may need to handle during starting - may result in arcing inside and destruction of both the cable-end and power supply connectors. Fortunately, the Omni-100 power supply seems to tolerate these faults well without blowing up. The red "Over Current" fault LED (located inside on the top PCB on the right side and visible through the grill) will come on as it tries to start the tube. The green Power LED will remain lit, but the power supply is essentially shut down and nothing else will happen until AC power is removed entirely for at least 3 seconds.
Basic operation of the Omni-100 power supply
The power up sequence should go something like:
When switched to "Shutdown", the Cd and He Heater LEDs go off and the discharge should become very slightly dimmer since it's current is reduced (from about 100 mA down to 82 mA). After 2 minutes and 17 seconds, the discharge will go out and the power supply fan will turn off. 35 seconds later, all power will shut off. During this latter 35 seconds, the red Temperature Lockout LED will probably come on indicating that the tube is too hot to restart. (Delay times are with respect to 60 Hz line frequency. On 50 Hz, they will be 20 percent longer.) The system will not restart even if switched back to Opreate or Standby until the Temperature Lockout LED goes off in another few minutes, but will do so automatically once it does.
When switched to Standby, the discharge is at 82 mA but the Cd heater is off so there will be no beam after the Cd in the bore is depleted. Running in Standby when not actually being used reduces the time to get to full power compared to a cold start. I also recommend switching to Standby for 10 minutes or so before switching to Shutdown as the relatively short time delay in Shutdown before all power is removed may not be sufficient to guarantee that all the Cd vapor is gone from the tube.
Melles Griot claims you don't have to run these lasers periodically to keep them healthy, at least not on newer lasers. However, it may be better to do so to be safe, perhaps a couple hours a month.
Checking or monitoring the high voltage
On newer Omni HeCd laser heads, there are externally accessible test points which include one for the high voltage. On older heads, the cover over the front of the head must be removed to gain access but it's much safer to check voltages there than in the power supply since only low voltages are present there. The high voltage to the tube (before the starter) may be determined by measuring across R19, the resistor that personalizes the laser head to the power supply in terms of tube voltage. The actual voltage will then be V*10M/R19. R19=21.0K for X39 tubes, 13.3K for X56 tubes, and 12.1K for X112 tubes. I don't know what the value of R19 is for X74 tubes but it's probably between 8K and 10K.
I constructed a little widget which is now wired across R19 in my 439-5 laser head with a high resistance voltage divider so that my trusty Radio Shack DMM displays the voltage directly.
Fine tuning cadmium temperature:
R2 is the fine adjustment for the tube voltage set-point based on cadmium pressure. The range of R2 is about 7 percent or 0.7 percent/turn. For testing or diagnostic purposes, an increased range may be desirable without changing the original set-point. The cadmium temperature can be tweaked externally by paralleling a resistor with R19 (to reduce it) or by injecting a small current via a resistor and DC power supply (to raise it).
CAUTION: DO NOT even think about touching R18, the helium pressure set-point!!! I don't know of an adjustment procedure and if you set it incorrectly such that the helium pressure goes too high, there is no way to get it back down without running the laser for a looooong time. Put a piece of tape over the pot to avoid temptation or accidents!
Mirror alignment:
WARNING: The HR-end mirror mount of Omni HeCd lasers has the full high voltage and is potentially very lethal. If the fan at the HR-end of cylindrical laser heads, or the cover of rectangular laser heads is removed, the HV is exposed. DO NOT remove the fan or attempt to adjust mirror alignment on the non-output (HR) end of cylindrical Omni HeCd lasers! The screws and flange are electrically live with up to 2,000 V or more! Mirror alignment screws for rectangular Omni HeCd laser heads are accessible through 3 holes at each end of the case and are safe. All you can do is mess up lasing or possibly crack the tube if they are turned too far. Mirror alignment isn't the problem unless someone before you messed with it!
Omni HeCd lasers have three screws or nuts at each end for mirror adjustment.
Like any other laser, fine tuning of mirror alignment including mirror walking can be performed as long as there is some lasing at all. If there is no beam but everything else about the laser checks out (tube voltage, discharge color, etc.), then mirror alignment may be the problem, though only likely if someone before you attempted to adjust it. It's not likely to change on its own.
A HeCd laser is similar to other narrow-bore gas lasers in terms of suitable alignment techniques. For the Omni HeCd lasers, the closest is probably internal mirror helium-neon laser alignment, with the understanding that the actual adjustments can be performed using the screws or nuts and no metal bending is needed. :) Coarse alignment (unpowered) can be performed using a red HeNe laser beam aligned to cleanly pass through the HeCd bore, adjusting the reflections from both mirrors to coincide with the HeNe laser's output aperture. Or, an autocollimator can be used. Then peak and walk the mirrors once there is some lasing.
  Omni-3074       Standby    Operate
 Tube Voltage     (82 mA)    (100 mA)   Comments
----------------------------------------------------------------------
 Cold spec'd:       --       3000 V     From Omni manual
 Cold measured:     --       3040 V     Immediately after power up
 Hot spec'd:        --       2630 V     Normal operation after warmup
 Hot measured:    2529 V(1)  2615 V     Normal operation after warmup
 Hot measured:    2940 V     3020 V(2)  Without cadmium heated
Notes:
These data were taken at the laser head test points. Note that the tube shows a positive resistance in this case. I do not know if the negative resistance of the sick laser is a symptom or whether the difference is due to measuring the voltage before or after the ballast resistors.
I also found something interesting which I first noticed after leaving Operate and switching to Standby. The laser continued to emit a weak beam well after it should have ceased according to the manual. And, when powering up in Standby, the same weak beam appeared fairly quickly, before the Cd should have had a chance to be heated sufficiently for normal lasing. In Standby, no Cd heating is supposed to be taking place and the Cd Heater LED on the Omni-100 was always off. However, since the Cd Heater LED only monitors 1/2 of the AC cycle, it's possible for the Cd to still be heated at a reduced power level due to a failure of the triac that controls the Cd heater in the Omni-100 power supply. The triac could be turning on for the other half cycle with no indication on the front panel, though such a triac failure mode is quite unusual and would almost certainly result in an inability to regulate Cd pressure since the minimum duty cycle would be over 50 percent. More likely, this quirk is caused by some residual Cd in the bore or near the bore that is getting heated by the discharge. In fact, after about 1/2 hour in Standby, lasing ceased entirely and the tube voltage climbed to a stable 2,940 V, presumably as the Cd was depleted from where it shouldn't have been. I will be keeping an eye on this behavior in the future. I'm not sure of the implications should this occur frequently during Shutdown with some Cd vapor still present when the system actually turns off.
The tube voltage versus time charts for Operate and Standby after the Cd had been fully cleaned out of the bore or whereever, are shown below:
Healthy Omni-3074 entering Operate from a cold start:
  Time (M:S)    Event              Tube Voltage   Trend After Event (Speed)
 -----------------------------------------------------------------------------
    0:02        Discharge on         3043 V       Increasing (very slow)
    0:55        First maximum        3048 V       Decreasing (slow)
    2:05        First minimum        3004 V       Increasing (very slow)
    3:25        Second maximum       3020 V       Decreasing (slow)
    4:35        Onset of lasing      2964 V       Decreasing (medium)
    5:45        Passes set-point     2615 V       Decreasing (fast,slowing)
    6:00        Second minimum       2534 V       Increasing (medium,slowing)
    8:00        Stabilized           2615 V       Slight overshoot (stopped)
I'm not sure of the cause of the small maxima and minima in tube voltage during normal startup but they do occur consistently. They are not present with the sick Omni-459 discussed in the next section.
Healthy Omni-3074 entering Standby from Operate:
   Time (M:S)    Event               Tube Voltage    Trend After Event (Speed)
 ------------------------------------------------------------------------------
      0:00       Enter Standby          2525 V       Increasing (medium)
      2:17       Normal shutoff time    2880         Increasing (slow)
      6:00       Lasing ceases          2901 V       Increasing (very slow)
     15:00+      Equilibrium            2940 V       Steady (stopped)
The time required for lasing to cease when entering Standby seems to depend on how long the laser had been running in Operate. If run for only a couple minutes after stabilizing, lasing will cease in under 3 minutes and possibly by the 2 minute and 17 second time when the discharge would be turned of during Shutdown. However, when run for about 20 minutes, as was the case above, lasing continued for almost 6 minutes, though the output power did decrease to below 10 percent of the operating power by the 2 minute mark. I do not know what the limiting value for the "cease lasing" time is if the laser is run continuously for days. Based on the condition the laser was in when I acquired it assuming it had been run continuously in its former life, that time was much greater than 10 minutes, with the time until the tube voltage leveled off measured in hours (but that final tail may be unrelated).
Since lasing may cease entirely only well after the normal delay of 2 minutes and 17 seconds in Shutoff (which is identical to Standby except for actually turning off the system), I'm wondering if it would be better to run in Standby for several minutes - until several minutes beyond the time when there is no output beam - and then switch to Shutdown, rather than going to Shutdown directly from Operate. Any lasing suggests that some Cd vapor is still present at that time and beyond, though perhaps it's guaranteed to be so small by then to be of no consequence. But even if this is the case, using the extended shutdown procedure won't hurt and may be better for the long term health of the laser.
As part of the effort to determine the problem with the HeCd laser described in the next section I used a monochromator to look at the discharge spectrum. The chart below shows all the lines found in the discharge between approximately 400 and 700 nm that were more than 1 or 2 percent of the most intense helium line at 587.6 nm. There was no convenient way to position the entrance slit of the monochromator next to the bore so it is actually looking through a hole in the case that normally allows access to the tube voltage adjust pot. :) It is more or less in the center of the laser so I assume most of the light comes from the positive column in the bore:
                          Relative Intensity
    Wavelength   Source    Standby  Operate
  -------------------------------------------
     441.0 nm      Cd         0        20
     467.2 nm      Cd         0        30
     479.5 nm      Cd         0        90
     508.2 nm      Cd         0        90
     643.8 nm      Cd         0        45

     447.1 nm      He        75        45
     492.2 nm      He        30        15
     501.6 nm      He       100        60
     587.6 nm      He       850       675
     667.8 nm      He       150       125
     706.5 nm      He       100        60
Note how the intensities of all the He lines decrease when the Cd is present.
The wavelengths were only approximate from the monochromator (+/-1 nm perhaps) but were checked against the NIST Atomic Spectra Database for Cd and He to confirm their source and determine their exact wavelength.
In any case, there is one major problem and one minor problem:
Incorrect tube voltage characteristics and no lasing:
OK, maybe that's two major problems. :)
The laser starts without hessitation and runs normally, but the tube voltage doesn't behave anything like it should according to the Omni operation manual and there is no output at any time, though the discharge color at startup looks correct in comparison with a working Omni-3074 HeCd laser. The discharge color then passes through a period where it would be correct for normal operation, but due to the incorrect tube voltage, finally stabilizes with excessive cadmium temperature, a blue discharge, and "gulping". From startup until beyond the normal operation point, the spectra look similar (at least by eye using a diffraction grating) with the cadmium red line appearing as the Cd temperature rises and becoming quite intense.
  Omni-439-5      Standby   Operate
 Tube Voltage     (82 mA)   (100 mA)   Comments
-------------------------------------------------------------------------
 Cold spec'd:       --      1300 V     From Omni manual
 Cold measured:   1216 V    1192 V     Immediately after power up
 Hot spec'd:        --       950 V     Normal operation after warmup
 Hot measured:      --       950 V(1)  With cadmium heated, but gulping
 Hot measured:      --      1100 V(2)  With cadmium heated, normal color
 Hot measured:    1180 V    1156 V     Without cadmium heated
Notes:
Note the negative resistance of the tube - about -1.33K ohms. This value could probably provide some diagnostic information as well if I only knew what! :)
Of course, the actual voltages are quite different for the Omni-3074 and Omni-439, but it's quite clear that with the healthy laser, the vaporization of the cadmium has a much more dramatic effect on tube voltage compared to the small change only from tube warmup (without the cadmium being heated).
Here are charts of tube voltage versus time for this laser:
Sick Omni-459 entering Operate from a cold start:
  Time (M:S)    Event              Tube Voltage   Trend After Event (Speed)
 -----------------------------------------------------------------------------
    0:02        Discharge on        1190 V       Decreasing (slow)
    1:00                            1162         Decreasing (slowing)
    2:00                            1143         Stopped
    3:00                            1143         Decreasing (very slow)
    4:00                            1140         Decreasing (slow)
    5:00                            1133         Decreasing (slow)
    6:00                            1120         Decreasing (medium)
    7:00        Normal color        1100         Decreasing (fast)
    8:00        Excess blue         1050         Decreasing (very fast)
    8:30        Gulping              930         Increasing (fast)
    9:00        Gulping              968         Decreasing (slow)
   10.00        Gulping              950         Overshoot/ringing (stopped)
When gulping, the tube voltage never settles down entirely. Maybe there are uncontrollable puffs of Cd vapor being emitted from the Cd reservoir! Gulp, gulp. :)
Sick Omni-459 entering Standby from Operate:
   Time (M:S)    Event               Tube Voltage    Trend After Event (Speed)
 ------------------------------------------------------------------------------
      0:00       Enter Standby          ~980 V       Increasing (fast)
      1:00       He discharge color     1150 V       Increasing (medium)
      2:00                              1161 V       Increasing (slow)
      3:00                              1163 V       Increasing (very slow)
      4:00                              1165 V       Increasing (very slow)
      5:00                              1167 V       Increasing (very slow)
     30:00                              1175 V       Steady (stopped)
By 1 minute after entering Standby, there is virtually no Cd vapor remaining in the bore.
For now, I've paralleled R19 (the resistor in the laser head that determines the coarse tube voltage set-point based on tube type) with 120K ohms to make the Omni-100 control loop stabilize at a cadmium temperature that produces approximately the correct discharge color. In essence, the controller thinks the tube voltage is really 950 V and is very happy. Hopefully, this will bury helium in the condensed cadmium and drive down the helium pressure until conditions are suitable for lasing without using an excessive amount of cadmium. I also removed the He heater fuse (F7) to make doubly sure that the power supply doesn't get any wild ideas about adding helium. :)
Measurements made on the helium pressure sensing circuitry are not promising. Here are the voltages found on the terminals of the laser head PCB in the Omni-439-5:
  Pin   Reading    Function
 ----------------------------------------------------------------------------
   1    +4.97 V    +5 VDC (locally regulated)
   2    +5.26 V    Voltage on He temperature sensing thermistor RT1
   3    +8.42 V    Voltage on He temperature/pressure sensing thermistor RT2
   4   +18.43 V    DC input to laser head PCB from Omni-100 power supply
   5    +2.01 V*   Tube voltage set-point on wiper of R2
   6     0.00 V    Ground
   7    +9.46 V    He reference voltage adjusted by R18
   8      --       NC
   9    +2.01 V*   Tube voltage measured across R19
* For pins 5 and 9, the actual tube voltage is found by multiplying these values by 496.16 (10,000,000/R19).
I added a cable from the laser head PCB so that the temperature and pressure sensor voltages (on RT1 and RT2), in addition to the measured tube voltage (on R19) could be conveniently monitored since these cylindrical laser heads have no external test points.
The 4 wires are:
The wire colors are what I used. They have no cosmic significance and are isted here only for my personal reference.
The two thermistor sensors (RT1 and RT2) are close together at the cathode-end of the tube near the helium reservoir. They both should have a resistance of around 5K ohms at 25 °C.
For this laser, the voltage across RT1 is 5.26 V resulting in a voltage, V1, of 5.88 V at the noninverting input of the helium heater comparator, AR1, on the laser head PCB (an LM311 used with a 1M resistor for positive feedback to provide a small amount of hysteresis). (These is a resistor network to adjust the calibration accounting for the difference in RT1 voltage and comparator voltage.) And the resistance of RT1 is very close to 5K ohms so it is at about 25 °C.
For this laser, the current through RT2 is 3.46 mA, its resistance is 2.433K ohms, and the voltage, V2, across it and into the inverting input of AR1 is 8.46 V.
With V1 being less than V2 - much much less for this laser - the He heater is solidly off. There are only two possible explanations: (1) one or both thermistors are defective or (2) the helium pressure is much too high. A higher He pressure results in more heat transfer from the thermistor and a lower temperature, lower current, and higher resistance. In fact for the two inputs of the comparator to be equal, the resistance of RT2 would have to be only 494 ohms. Indeed, paralleling RT2 with a 470 ohm resistor turns on the He Heater LED. RT1 being around 5K ohms seems perfectly reasonable but RT2's values are - not to put too fine a point on it - messed up. To rule out RT2, I tested both of the spare thermistors with an external circuit and they behaved exactly the same as RT2. The heat transfer is so large that its temperature doesn't increase by more than a few °C. So the He pressure is probably very high and/or there is gas contamination. The pressure can probably be determined analytically, though I wouldn't want to try! But it certainly would appear to be very high and I rather doubt that any sort of treatment that doesn't involve reprocessing the tube will help - even running it for a year!
Note that the expected currents in both RT1 and RT2 differ by about a factor of 3 compared to the description in the Omni operation manual. That references 3 mA and 30 mA for RT1 and RT2, respectively. Based on the schematics and the actual circuitry in this laser head, the corresponding values at the point of equilibrium would be 1 mA and 12 mA. The larger current are essentially impossible under any conditions. I bet the description is for an older version of the laser and it was never fully updated.
Next, in an effort to determine if there was gas contamination, I used my monochromator to look at the discharge spectrum through that hole I drilled in the cylindrical laser head. The chart below shows the spectra of the sick Omni-459-5 next to the healthy Omni-3074, with the data normalized to make the strong 587.6 nm He lines of equal intensity in Standby:
                           <------- Relative Intensity ------->
                           Sick Omni-459-5    Healthy Omni-3074
    Wavelength   Source    Standby  Operate   Standby  Operate
  ---------------------------------------------------------------
     441.0 nm      Cd         0        10        0        20
     467.2 nm      Cd         0        50        0        30
     479.5 nm      Cd         0       150        0        90
     508.2 nm      Cd         0       150        0        90
     643.8 nm      Cd         0        50        0        45

     447.1 nm      He        50        30       75        45
     492.2 nm      He        25        10       30        15
     501.6 nm      He        75        40      100        60
     587.6 nm      He       850       650      850       675
     667.8 nm      He       175        80      150       125
     706.5 nm      He        75        40      100        60
The sick laser was run in Operate mode with a tube voltage that resulted in approximately the correct discharge color. With a healthy HeCd laser, the He line at 643.8 nm and the Cd line at 667.8 nm should appear of about equal intensity and they do by eye. While there is a significant difference in the measured intensities, it's actually less than in the healthy laser. And in any case, the adjustment of the discharge color was only approximate. I also cranked up the Cd and run it gulping for a few minutes, and indeed the intensities of the Cd lines I checked increased by several fold.
It is of significance that there are no detectable lines likely from other sources than He and Cd. Anything with a high enough concentration to adversely affect lasing would probably have been detected unless it was very close to a He or Cd line and both were measured as a single peak.
While there are differences between intensities of the lines in the two lasers, what's amazing is how similar they really are for the most part. Some of the discrepancy can be attributed to measurement error as the monochromator was simply sitting next to the lasers. For the Omni-3074 in particular, the gain was cranked way up since it was viewing the discharge indirectly through a small hole, so any movement would result in a large change in signal level. Certainly, except perhaps to an experienced spectroscopist, nothing jumps out and says: "I'm the problem!". :) I guess this is both good and bad.
And finally, I checked mirror alignment using a red HeNe laser bouncing off both the OC mirror and through the bore off the HR mirror. Pressing on the flanges of each mirror confirmed the source of the reflections. The alignment was fine and the return beams didn't show excessive scatter that might indicate degradation or contamination of the mirrors.
So, in summary:
Therefore, the conclusion remains that the He pressure is simply way too high and this is preventing lasing.
Intermittent Cd heater connection:
This occasionally causes the Cd to not start heating until the head is tapped or the cables are jiggled. There were no obvious bad connections at the accessible cathode-end of the head cylinder, though a pair of splices could not be inspected. Getting to the anode-end would require pulling the tube.
The only problem if it's in the heater itself is replacing the coating of thermal insulation over it after the repair. What is that stuff? It's not asbestos. Does it come in spray cans? :) If wet down, it falls apart. The entire heater is just some thin strips of nichrome or steal wrapped around the tube and spot welded together. Maybe NASA can help. They know all about thermal insulation!
But given the high helium pressure, an intermittent Cd heater may only be an academic curiosity and the repair would be straitforward in any case. :( :)
Open Questions
As noted elsewhere, HeCd lasers with internal helium sources have a tendency to go over-pressure after sitting for some time. In Omnichrome heads, this results in "gulping" as the tube voltage-controlled cadmium heater works overtime to lower the voltage. Almost all Omnichrome lasers made before 1990 seem to have some degree of this malady, but there is hope without reprocessing the tube. One effect of high helium pressure is that the tube will not lase at the original operating current. Often though, lowering the operating current (along with adjustment of the cadmium heater controls) will put you back into a lasing regime. So far, all three of mine have responded favorably to this. A quick test you can try: From a cold start, switch the laser to Operate and watch the discharge color. As it starts to become white, but before serious gulping begins, switch to Standby. Now, it may very well lase for a while as you are sweeping the cadmium-to-helium ratio at reduced current. At the 82 mA standby current, these tubes will still function, so you can go ahead and modify settings as you need. If this test fails, more dramatic means might be necessary to recover lasing.
They use a cold cathode which looks like an oversize neon sign electrode and the anode is a wire electrode next to the Cd reservoir. The control loops are constant temperature to regulate Cd pressure and tube voltage to regulate He pressure. There is a large gas reservoir connected via a side-arm, with the high pressure He reservoir surrounded by its heater at the far end. Almost all of the tube is covered in thermal insulation including the entire bore. The laser heads use convection cooling - no fan(s). Partially for this reason, their operating temperature range is somewhat smaller than Omni.
All Liconix HeCd lasers I know of have external mirrors and a Brewster window tube so the output is linearly polarized and the mirrors may be interchangeable for 325 nm, 442 nm, or both wavelengths at the same time.
I'm not sure of the startup in newer Liconix HeCd lasers, but on older ones, turning the key-lock power switch to the run position will cause the power supply to attempt to start the tube immediately. If the tube does not strike, or does not stabilize with the proper operating current, the starting voltage will be applied for a few seconds, then cut off, then is applied again in second or so length pulses about 15 times. If the tube has still not started successfully, it then gives up. I'm not sure if it tries again later but a restart can be forced by grounding the lone pin in the center of the power supply control PCB. (More on this coming.) A healthy laser should start instantly and stay on with a solid bright yellow helium discharge color. One that's sat idle for just a bit too long may require a few restarts to stay lit and then should be run for a good long time to make it happy again. If it's too far gone, the starting process will not work and during that time, the discharge - if it lights at all - will be erratic and stuttering. The discharge color may be pink or purple near the cathodes if there is significant gas contamination. It should be honey-yellow to yellow-white throughout. And none of this will help. Most Liconix lasers found on eBay are too far gone. In some cases, it may be possible to run them for a few days or weeks or months on a HeNe laser power supply if they won't stay lit with their own power supply to clean up the contamination, but that's a long shot.
Unlike Omnichrome, Liconix HeCd lasers have no shutdown sequencing requirements. They supposedly use lower tube current and have an advanced cold trap design so Cd vapor condensing on the Brewster windows is not a problem. This better work since there is no equivalent to Omnichorme's tandby mode for the Liconix power supplies.
Higher power Liconix HeCd lasers use a tube with two bores. For these, the neon sign electrode cathodes with the negative high voltage on them are electrically at each end (physically in side-arms) fed through external ballast resistors. The Cd reservoir with its heater, and anode terminal are in the center near ground potential. The large gas reservoir, and helium reservoir and heater, are attached as a side-arm near one end. The power supply for the dual bore lasers has two complete and almost totally independent HV sections with common control circuitry.
I've heard of using an Oudin coil to help start these lasers where the discharge doesn't want to go down the bore, but rather seems to pulse through the gas reservoir. However, use this with caution as I've also heard that the power supply (or at least the starter) might be damaged by this stunt, or it might have just been a coincidence where one output of a dual output power supply failed when attempting to restart after having run the laser for several hours. I'll have more on this if info becomes available.
Apparently, Liconix HeCd laser tubes are all soft-sealed so periodically running them is essential to long life. Leave them alone and they may end up being quite dead after a few years. I don't know if this has improved with current production models.
I'm not actually absolutely sure what make or model HeCd lasers the following applies to, but it's NOT Omni:
(From: Mike Hager (mhager@sbcglobal.net).)
You can check for the Cadmium by using a transmission grating and watching the discharge from the middle of the capillary tube. You will have a blue, a couple of green, a yellow and one red line. After about two minutes, you will see more blue, green lines, and the important second red cadmium line.
A small hole should be good enough to see the plasma inside the capillary, if not remove some of the insulation so you can view the discharge.
The He heater should come on only very infrequently or never. For a one minute shot of heating the He reservoir, you will need around 100 hours of run time to deplete it. Most of the time, the He heater LED may only come on at start up, if then. This should only last a second or two until the control circuit stabilizes.
This is not the case of the cadmium partial pressure which will deplete in minutes! HeCd tubes can be hard to start if the He pressure is too high, sometimes using crushed dry ice around the tube will drop it enough to ionize the gas. The only problem is condensation on the tube. I completely disconnect the He heater so there is no chance for a shot unless it really needs it.
The Cd heater circuit is a fixed temperature loop, not relying on tube pressure/voltage for control. However the He does use a diode in addition to monitoring tube voltage for its control. If the discharge color is changing from a pinkish to blue, then you have a condition known as "gulping". This is caused by too much cadmium heater voltage, monitor the test points and reduce until no more blue is noticed.
It is suggested to run these HeCd lasers for 24 hours for every month of storage. The reason is that the the Helium will diffuse from its high pressure reservoir into the tube, resulting in a high He pressure/tube voltage. I have had to run some tubes for months to bring the He pressure down far enough to allow lasing. You can't just raise the Cd partial pressure to get these things to lase. Keep monitoring the tube voltage day after day and you will see a drop from the depletion of excess He.
If the OC mirror has a yellow tint (in transmission), it's a 441.6 nm head. If it is clear with a slight hue on it, it is a 325 nm UV head.
(Portions from: Phil Bergeron (pbergero@cas.usf.edu).)
WARNING: The high voltage to the tube can be quite deadly. You must have a healthy respect for power supplies producing several kV at 90 mA! You should see the sparks to ground they can throw. Think of what that will do to a nice moist human body. Unplug the supply from the wall and disconnect the HV wires from the laser head before touching anything inside and keep hands away from the laser tube when it is on!
IMPORTANT: Before applying power again, remove the ballast resistor covers in the laser head to avoid a spark-over to ground. That is critical since with a hard-starting tube, the voltage may go high enough to jump the undersize gap, and that may eventually take out the control chip(s).
I'd also recommend disconnecting the helium heater to prevent any possibility of the power supply deciding incorrectly that He is needed, making matters worse.
The cause of starting problems is that the He pressure is way too high so the sustaining voltage is out of range of the supply until some Cd vapor is present. So we added a simple push button switch to defeat the start timer.
Unplug the supply and allow a few minutes for the lethal capacitors to discharge. Although you won't be going near them, it's still worthwhile! Then open the case. Facing the front on the left side is a small board just behind the left handle. In the middle is test point 2 labeled TP2. On the top of the small board is a ground loop for attaching meter/scope probes. Shorting TP2 to ground defeats the start timer. Liconix 4240 Start Timer PCB. shows the switch installation on a Liconix 4240 power supply. There is a similar PCB in other Liconix power supplies but the location may differ.
Bypass the start timer and let it try to start. If it winks out, immediately restart it. Melles Griot recommends to try for about a minute or so and then wait a few minutes before another attempt (presumably to allow the power supply to rest). Once it stays on long enough for some Cd to vaporize, the tube voltage will come down and it should stay on.
Then let the laser run continuously to drive down the He pressure - for 2 to 3 weeks or maybe longer. No kidding! I revived a laser like this only to have some unnamed faculty member ignore it for too long that it is now quite dead.