The design of the PFN can significantly affect the performance of a solid state laser including the lasing threshold, peak power, pulse consistency, and so forth. There is some general information on PFN design at the Plastic Capacitors, Inc. Pulse Forming Network Page. Some of the basics are covered in subsequent sections below.
External triggering has the advantage of decoupling the PFN from the trigger transformer. The circuit design is simpler since allthough the peak trigger voltage needs to be somewhat greater than with series or parallel triggering schemes, the trigger circuit doesn't need to carry the flashlamp current. However, since the trigger wire/electrode is outside the flashlamp and exposed to the enviroment, triggering may be less reliable and there is some evidence that flashlamp efficiency is slightly lower. For these reasons, commercial pulsed lasers tend to use series triggering. There must be a way of locating a well insulated trigger electrode in close proximity to the flashlamp. Otherwise, series or parallel triggering must be used. Examples include a situation where the cavity reflector and chassis are electrically connected or where there is simply no space for a trigger electrode or no way of adding one easily (e.g., to an existing liquid cooled cavity).
What we call the solid state laser power supply is thus items (2) to (4). Depending on the details, these may be combined into a single unit. However, large pulsed lasers will generally have them separate. Looking through the classifieds sections of the lasers and optics trade rags, you will see many advertisements for "capacitor charging units" since this function can easily be dealt with independently of the rest of the laser.
There is a great deal of practical information on using flashlamps and designing pulse forming networks in Don's General Xenon Flash and Strobe Design Guidelines Page which also includes some basic design equations.
Some links:
Some systems will also have foot or hand operated "fire" controls. As with interlocks, these must also be designed to not fail on due to a broken wire or loose connector. They will generally include both a normally open and normally closed input and require a transition on both to activate the laser. In other words, just closing or opening a single circuit isn't enough - one circuit must be closed and the other opened within a short time (e.g., using a SPDT switch).
In all cases, with interlocks and firing controls, simpler is better. Relay and switch contacts are more reliable the low level inputs to a microcontroller which can crash. :(
The nice thing about this approach is that everything needed for the SS laser power supply is already contained in a well constructed, compact, and low cost (possibly free) package. Flash units for disposable (single-use) cameras are often available for the asking from your local 1 hour developing kiosk or similar place (if you can convince them you won't kill yourself) but you'll probably have to lug away a carton of used cameras (the AA batteries alone are worth the trouble - they usually have a lot of life remaining). WARNING: It is likely that the energy storage capacitors will still be at least partially charged - ouch! Broken external and shoe mounted electronic flash units may be available for little or no cost as well (Often, there is only physical damage to the shoe mount mount and the relevant parts of the unit are fine.) If you know a friendly professional photographer or photo nut who has since moved on to videography, they may have an old large unit gathering dust which you could 'borrow' permanently. :)
For this approach to be effective, the following 3 conditions must be satisfied:
Photographic flash units rarely have any pulse forming components beyond the energy storage capacitor (at least I haven't seen any inductors except as required by energy conserving flash designs). Thus, shortening the output pulse usually isn't an option except by replacing the energy storage capacitor with proper pulse forming network.
However, I would suggest remounting the flashlamps and reworking their reflectors into the desired ellipsoidal configuration if possible (relatively easy if they are chrome plated sheet metal) so they can be positioned very close to the rod rather than attempting to collect the light and refocusing it. I disagree somewhat with Chris's comments about the unsuitability of Kodak flash units - there are ways of dealing with controlling multiple flash units and I actually consider the flashlamp not being an integral part of the reflector to be an advantage so that it can be mounted properly. (Note that the newer Funsavers, if they are still made, are probably similar to MAXes; the old ones used a somewhat different design.
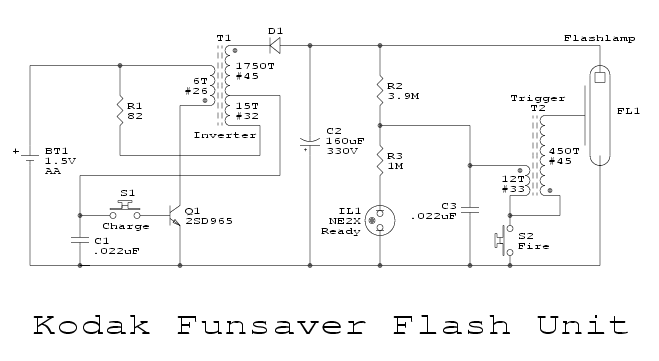
See: Kodak Funsaver Flash Unit Schematic, Fuji Flash Unit 1 Schematic, and Fuji Flash Unit 2 Schematic and the descriptions in Sam's Strobe FAQ in the PART IV in the chapter: "Schematics for Pocket Camera and Externally Mounted Compact Flash Units".
See the section: Power Supply for Micro YAG Laser (uYAG) for details on this approach using a single flash unit from a Kodak MAX camera.
(From: Chris Chagaris (pyro@grolen.com).)
This set-up may actually be capable of pumping an Nd:YAG rod of small dimensions (2" X 3/16"?). There are a number of different cameras that may be utilized for this experiment. Some lend themselves to simpler manipulation than others. The Kodak 'Funsaver' is the least desirable of the many models you may encounter for a number of reasons. The first being: the flash unit has a logic circuit to initiate the inverter. This circuit is very sensitive and will be rendered inoperative when the units are connected together and triggered, leaving the charging system useless. Secondly; the small xenon lamps and the reflectors are separate entities causing much difficulty in securing them in the appropriate positions on the laser unit. Better results can be obtained with the cameras manufactured by FUJI, which do not have these drawbacks.
Basically, anything that can charge a capacitor to a specified voltage (without going over it) will work. At most, a rectifier or bridge will be needed to adapt circuits originally designed for AC (e.g., fluorescent lamp inverter). For the following, even if not mentioned, unless otherwise noted, a voltage multiplier can be used to boost the output up to several times (doubler, tripler, quadrupler, etc.).
Commercial capacitor chargers are usually rated in terms of output voltage and charging rate in joules/second (J/s). For typical home-built systems, a rough idea of the requirements/capabilities can be found by determining the maximum energy to be placed on the energy storage capacitor and the power/wattage capabilities of the circuit or those that are needed based on the desired firing rate. Then derate by a factor of 3 to 5 to account for the exponential charging characteristic of your system (since it probably doesn't have fancy constant current or constant power regulation! For example, if your capacitor charger is rated at 100 W (100 J/s) and you have a 50 J capacitor bank to charge, figure it will take 6 to 10 seconds, not the 2 seconds that would be nice. :) However, home-built capacitor chargers are often way overdesigned (or gross overkill if you prefer) considering that the ultimate limitation on cycle time is likely to be cooling of the cavity components, particularly the flashlamp.
Here are some possibilities for capacitor charging circuit:
WARNING: Defibrillators are at least as good at stopping beating hearts as restarting misbehaving ones. The charge in their energy storage capacitor (typically 300 to 400 joules) is enough to kill a half dozen healthy adults instantly. The operating voltage (up to 5 kV) doesn't respect common wire insulation and can jump 1/4" or more in air. There are no second chances.
(From: Steve Roberts.)
Older defibrillators are now showing up as inexpensive surplus because their ancient edmark waveform is being replaced with newer computer controlled biphasic waveforms.
So what do you get in a typical edmark waveform defibrillator:
Notes: The relay is usually a 5 kV 50 A DPDT which has a short across one set of contacts to protect the patient. The other set of contacts goes to the capacitor common leads and to the patient via the paddles. So, presto! - apply 12 volts to the relay and you get up to 360 joules dumped into the victim or patient via the inductor to control the waveform. A patient's chest is assumed to be about 50 ohms impedance via the conductive cream to the paddles so the test circuit monitors what happens when the second smaller relay dumps the cap into the 50 ohm air cooled test resistor. The cap is also dumped during power-down.
I can't overstress the absolute need for safety when handling a 33 uF 5 kV capacitor. Newer defibrillators have a MOSFET H-bridge for bipolar switching and only go to two kV with smaller caps.
So:
              2 * E
         C = -------
                V2
To obtain this uF value and voltage rating may require a capacitor bank
consisting of a series/parallel combination of multiple capacitors in an
array. This creates problems of its own in guaranteeing that voltage is
(nearly) equally distributed or balanced among multiple series capacitors.
See the section: Series Banks of
Capacitors. Such issues are particularly critical for the rapid discharge
circuits being discussed here.
Also note that normal vanilla flavored electrolytic capacitors may self destruct if called upon for this service. Or, they may have too much inductance (increasing pulse duration) or too much resistance (resulting in excessive losses inside the capacitor(s). Electrolytics are probably adequate for ruby pumping with its long fluorescence lifetime (3 ms) but would be marginal for Nd:YAG (230 us) with a desired 100 us pulse duration.
For long duration pulses, ordinary high quality electrolytics capacitors may work without self destructing and/or dissipating too much energy inside the capacitor. However, for high-joule flashlamps operating with short pulse duration, you won't get away with this for either or both reasons. No, wiring 10,000, .01 uF, 1 kV disk capacitors in parallel probably isn't a very viable solution! :)
If you want to get an idea of what the "big boys" use, check out:
High quality motor run capacitors should be fine for most long to medium pulse length applications including flashlamps for ruby and YAG lasers. A motor run capacitor rated for 370 VAC is *probably* good for at least 500 VDC. In addition to simply the peak of the AC being 1.414 times the RMS, there are corona and other effects in the dielectric which limit the maximum reliable AC working voltage, resulting in a more conervative AC rating.
Aerovox High Voltage AC and DC Capacitors seems to show a relationship of between 1.75 and 1.82 (take the link to the datasheet).
Robin says below that it's much higher but I'm not sure this applies to all types.
(From: Robin Bowden.)
I have found that motor run capacitors are quite suitable. They are made from metalized polypropylene and there are models available up to at least 440 VAC.
If you look at dual rated AC/DC metallized polypropylene caps - then a cap rated at 400 VAC will likely be rated at 900 VDC. So I guess these 440 VAC capacitors are good up to 1 kV.
These are readily available and are relatively inexpensive. Here in the UK, a 40 uF (top end of available values) costs around 5.75 pounds (less than $10US).
I have a bank of three of these in parallel and use them to just over 900 VDC (50 joules).
Looking at the manufacturer's datasheet the LCR MRP series 40 uF caps (the ones I have), tan delta of less than 0.001 at 50 Hz. This tan delta figure is the worst case for all caps in the series. For a 40 uF cap this gives ESR of less than 80 milliohms.
A metal cased Arcotronics one stated tan(d) to be less than 0.002 (160 milliohm) but this incorporates an overpressure disconnect device (wire that breaks when the metal can deforms due to over-pressure). I guess this is responsible for most of those extra milliohms.
Today I took one of those caps into the lab to measure. Real world figures for the 40 uF LCR MRP series:
The caps are of wound construction with the termination in bulk from each side of the roll (not start and end of winding) I guess this explains the low ESR and ESL I don`t know how this compares to a real laser cap but it looks reasonable to me.
The datasheet states a maximum dV/dt of 20 V/us. I'm not sure how far you can push this - I assume it is to prevent overvolting the dielectric due to excitation of the self resonance rather than a maximum current issue.
(From: Don Klipstein (don@donklipstein.com).)
Sprague (a division of Vishay) 36DX and probably the similar Durocap/Mallory CG, CGH, etc., work fairly well for discharges that take a few hundred microseconds or more, and work well for discharges that take at least a millisecond. With a 1 millisecond discharge, maybe a couple to a few percent of the energy is dissipated in the internal resistance of the capacitor. (Note: Duracap International, Inc. is the actual manufacturer of the Mallory product line now.)
For shorter flashes, the Sprague TVA series (axial lead) is a little better than electrolytics that have both leads on the same end. But for flashes under about 100 microseconds, I know that the usual electrolytics may not be the way to go.
(From: Boris Mohar (borism@interlog.com).)
And then there are also: ECI Capacitors, Inc.Unlytic UL30 film capacitors.
They are packaged in the same form factor as electrolytics, computer style 3" diameter cans. Voltage range is from 300 to 1,000 WVDC (!!) with capacities from 50 to 1,600 uF. These are not electrolyics (I guess you figured that out, huh?) so they are non-polar. Impedance dip of 0.01 ohms or so is in the 30 to 100 kHz range. They are specified to handle thousands of amps peak currents.
I dare not ask the price.
(From: David Linsley (david.linsley@baesystems.com).)
Norfolk Capacitors Limited is a UK supplier of all types of capacitors including those suitable for pulsed lasers. See Norfolk Capacitors Limited Energy Discharge Capacitors.
Whether a system is critically damped, under-damped, or over-damped will depend on how the resistance of the discharge path (capacitor, inductor, flashlamp, and wiring) compares to the reactance of the LC network. However, it may not be possible to achieve both the desired pulse duration and critical damping.
Note that with a critically damped or over-damped system, there will be no undershoot which is the desired state of affairs. Undershoot damages flashlamps. In any case, it is a good idea to add a reverse biased high current diode across the output of the PFN. This will conduct if there is any undershoot bypassing the current around the flashlamp.
As an example, the energy storage capacitor in PFN1 (see the section: spspfn1">Pulse Forming Network 1) is 36 uF and for a Nd:YAG laser, a pulse duration less than 230 us (the fluorescence lifetime of Nd:YAG) is desired. The 30 uH inductor then results in: T = 3 * sqrt(3*10-5 * 3.6*10-5) or about 100 us.
While there are messy equations to calculate inductance based on number of turns; core type, style, diameter; number of layers, packing, etc. The easiest may be to construct a, say 10 turn, test coil and perform a 'ring test' to find its inductance. Then, scale as appropriate for your needs. Inductance is a squared function of the number of turns where the packing doesn't change much. Err on the high side and then remove turns to tune it precisely.
The 'ring test' just uses a pulse generator (almost any type) to excite the parallel combination of a high quality capacitor (I use polyester capacitor around 1 uF) and your test inductor. This circuit will resonate at:
                        1
         F = ----------------------
              2 * pi * sqrt(L * C)
So:
                     1
         L = -------------------
              (2 * pi * F)2 * C
With a high quality capacitor, each pulse from the pulse generator will
result in many cycles of a decaying sinusoid - enough to accurately measure
frequency or period.
(From: Chip Shults (aichip@gdi.net).)
I usually wind inductors out of 18 gauge magnet wire for this, and the resulting current doesn't melt them because it's so brief. I use a ferrite about 3/4" in diameter. 60 turns gives you about 35 uH with a single layer coil.
(From: A. Nowatzyk (agn@acm.org).)
For the 3" x 1/4" Q-switched ruby tank range finder, I used two 100 uF Maxwell caps (low ESR for pulsed application) and a 120 uH pulse forming inductor. The measured T1/2 is 200 us, peak power is 1.8 MW, peak current is 2500 A and peak discharge voltage is 700 V (caps were charged to 1000 V. The Q-switch lasing threshold is about 690 V.
The inductor was wound from 7 strands of 19 AWG magnet wire that were twisted into a round bundle with about 2 twists/inch. A linear air-coil works fine, but the stray field during discharge is very annoying to any nearby electronic. A toroidal inductor (air-core!) should work better. Forget any core-material other than air: At these currents, anything saturates and L will be much less that you would expect.
(From: Lou Boyd (boyd@fairborn.dakotacom.net).)
I did some tests on one of the M-60 ruby laser flash injection transformers and was somewhat surprised by the results. I hadn't worked with one before. Here's what I found:
The main winding, when placed in parallel with an 88 uF 5% capacitor (had one handy), resonates at 415 hz at a drive level of about 5 volts. That indicates an inductance for that winding of 1.68 mH when there's no core saturation. I was surprised that it was that large, I was expecting more like 200 to 500 uH. The more surprising part is that the resistance of that winding is only 0.052 ohms (DC). My ohmmeter just showed a short so I used a bridge. I couldn't access the other winding of mine directly since it's potted, but when driven through the .22 uF trigger capacitor at the assembly's resonant frequency of 545 khz (nothing attached to the secondary except a 10M scope probe) the step up was about 16 times. Dumping 500 V with the SCR should produce at least 7 kV to initiate the flash. The cap is rated 600 V. I have no idea at what voltages/rise times the core starts to saturate.
To wind an air core inductor of 1.68 mH inductance and get .05 ohms resistance would create a monster. A quick calculation says it would take about 100 turns of 12 gauge wire wound on a 6" cylinder using three layers. The permeability of the core on the inductor you have gives a dramatic size reduction. If you can dissect the one you have and rewind it I recommend doing so. My guess is that it's in the order to 50 to 100 turns of something around #20 gauge wire. Count them and measure the size of the wire if you take it apart. I don't have any idea what goo is holding it together. If it's an Epoxy it may not be practical to open it.
I presume you're certain the inductor/transformer is bad. Seeing what looks like a dead short with an ohmmeter on the output winding is normal. If there's an open between the heavy orange and heavy clear lead that's bad. If those lead have a DC path to ground the .001 uF, 5kV cap or the inductor could be bad. The only practical way to check for a shorted winding is to measure it's inductance. The resistance difference for a 1 turn short would be less than a milliohm.
One of the useful resources was an MS Excel spreadsheet that implements calculations for a variety of laser design issues including resonator parameters, power supplies, and pulse forming networks. It was on their Web site under "Ruby Laser Designs" named "weights.xls". I have an archived copy at: Rotorwave Laser Design Calculator Spreadsheet. (If someone complains, I may have to remove this file but will happily add any requested authorship or copyright information to it, or link to the original Web site. The only reason I copied it was that the Rotorwave Web site had been somewhat unreliable and the spreadsheet seemed to be particularly useful. Now that it's gone complete, that was probably a wise move.)
The organization of the spreadsheet is somewhat haphazard but there are a variety of useful equations solved for specific parameters. Cut and paste the relevant lines and drop in parameters for your laser and the result may be useful.
CAUTION: I have not verified the accuracy of all of these equations. So use at your own peril. I will not be responsible if the Universe should implode when you fire your laser for the first time! :)
(From: Doug Little.)
This updated version has been used to build a working ruby laser and appears to check out reasonably well in the 'real' world. In fact the calculations one way or another brought me to within a few percent of actual performance, which I think is not bad given that some of the efficiency figures are approximate.
The spreadsheet predicted my laser should threshold around 1,350 V at 633 uF, and it actually took place at 1,450V at 633 uF. This factors in the rod dimensions, reflector, lamp spec, lamp current, etc. So not too bad. :)
While tested under unix, (Sun OS and freebsd), they should compile under almost any C environment since there is definitely nothing fancy about anything and your minimal Turbo C should be fine! Just save the file and compile it with the command line shown in the program header.